We just did a shoot for a short horror film using our virtual production setup, shooting about 15 minutes of script over 15 hours of production. We’re making this film for the Louisiana Film Prize, a short film competition taking place in October 2023.
One of the things that made the shoot go so smoothly was the fact that we made a storyboard ahead of time using MetaHumans. Most of the cast and crew was new to virtual production, and the storyboard gave them insights into what we’d be shooting and how it would work. We were also able to use the same camera setups from Unreal Engine to get the backgrounds up in seconds, and to pose the actors according to the storyboard.
Check out our video about the process:
One of the best aspects of doing storyboards and production with Unreal Engine and MetaHumans is the way the cast and crew responded. Everyone was excited to be part of this new technology, and many came up with creative ideas on the fly. Because it’s so easy to adjust the background, lights, and camera angle, we were able to try different things and get a lot of footage for the editor to play with.
We’ll have more as we get into post and complete the film.
Earlier this year, Many Worlds Productions embarked on new adventure called virtual production. Virtual production is any filmmaking technique that seamlessly combines virtual and physical worlds in real time. You can think of it as any technique that cuts out post-production steps by mixing in the virtual world with the physical world during production, right there at the shoot. The production techniques used on the Disney+ series The Mandalorian are a classic example of virtual production.
There have been lots of filmmaking techniques over the years that combine the virtual and physical, but virtual production takes things a step further by eliminating that post-production step. And while budgets for The Mandalorian run into six figures per season, there are much less expensive ways to do virtual production.
We decided to start with a relatively inexpensive option: in-camera VFX (ICVFX) with rear projection. This technique is essentially a replacement for green screen. Instead of shooting an actor against a green screen and compositing the background in during post-production, the actor is shot against a screen showing the background. The background comes out of Unreal Engine live, meaning we can reposition it at any time, and compose our shots on the fly.
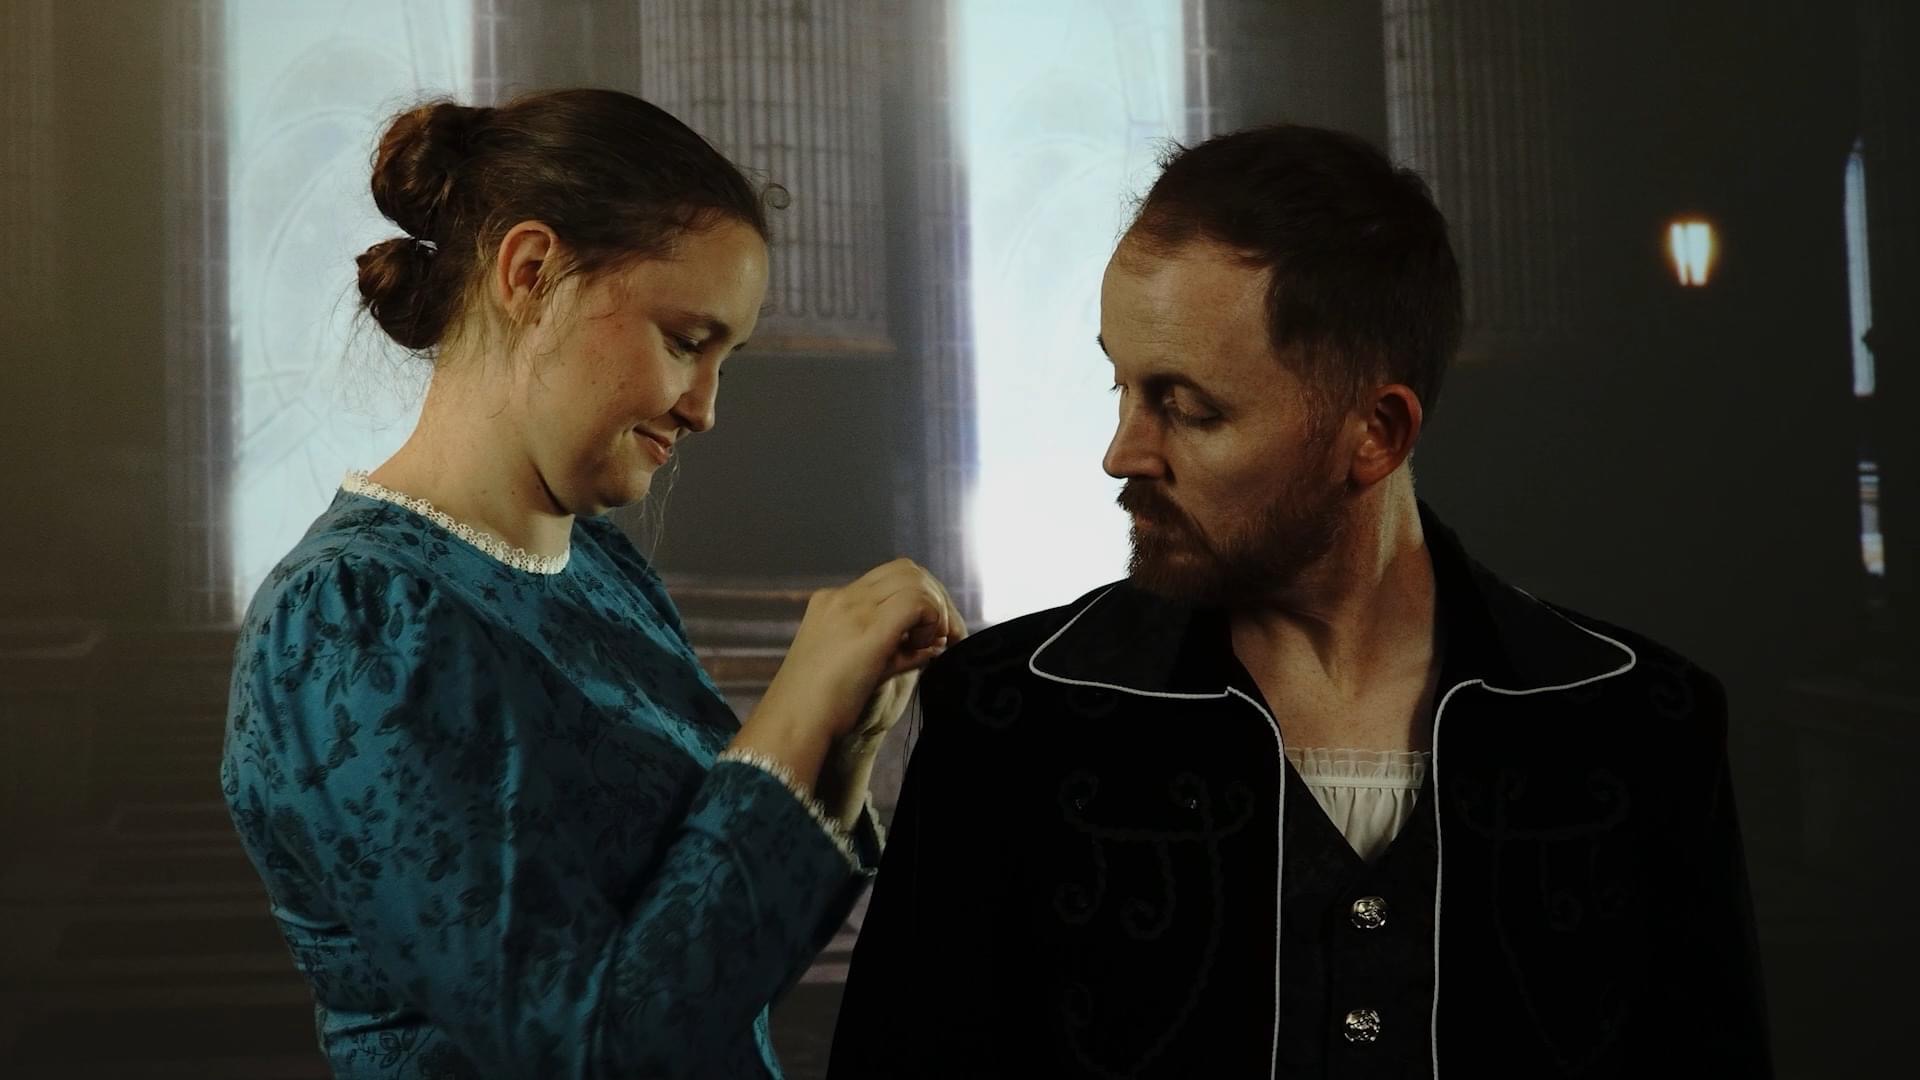
Video shot against projected background
Doing rear projection live in-camera also eliminates many of the challenges of compositing green screen footage–color spill, rough or mushy-looking edges around the live talent, green reflections on shiny objects, not to mention the basic challenge of lighting the green screen itself for an evenly distributed tone.
In the image above, for example, you can see the fine hairs on the actors’ heads against the bright window background. With green screen, these hairs wouldn’t show up, or might even disappear and reappear from frame to frame. ICVFX eliminates these issues.
Improving on historical rear projection
The grandfather of ICVFX is rear projection with pre-filmed footage, where a video or film is projected behind the actor during the action. One of the most famous uses of this classic technique was in the classic film The Wizard of Oz (1939), where the crew made a fake film of a cyclone ahead of time, and projected it behind the actors during the shoot.
This method has strict limitations, the most severe being that any movement of the camera upsets the perspective and breaks the realism. For example, if you look closely at the video above at around 1:40, you can see the ground immediately behind the fence sliding along in a strange manner as the camera pans to the right. It looks like the crew moved the projector to the right to move along with the camera and keep the distant tornado at the correct perspective, at the expense of realism for items in the foreground.
In 1939 these visuals blew everyone’s minds. Even today, the effect holds up pretty well–I watched this film at least a dozen times before noticing this problem–but the film was originally shown in theaters and then TV, where viewers couldn’t pause or rewind. But today’s viewers are a lot more savvy, and a situation like that would never fly on today’s streaming services.
Another limitation with traditional rear projection is that the projected film is what it is, and can’t be altered during the shoot. If the perspective of the projected image is just a bit off, you just have to deal with it.
When you use a background coming live out of Unreal Engine rather than a pre-filmed or pre-rendered background, there are two distinct advantages:
The background can be moved around or updated on the fly before shooting, so you can get the background you want. You can also blur it, lighten or darken it, change the sun’s position for different times of day, add fog, or do any manner of adjustments in real time, just before hitting the Record button on the physical camera.
You can connect up the physical camera’s position with the position of the Unreal Engine camera so that any movement of the physical camera during the shot will update the background to reflect the correct perspective. This technique, called camera tracking, opens up a whole world of possibilities. We haven’t explored this option yet, but we plan to in the near future.
Below is an account of our journey with rear projection out of Unreal Engine, when we used it to produce the short film A Common Thread for a three-day film competition.
For future projects, we’re doing a lot of test shots with backgrounds we found in the Unreal Marketplace, giving us the ability to put our actors in an office, a hospital, a snowy landscape, a spaceship, the Moon, or anywhere we like, all without leaving the comfort of our studio.
Stay tuned for more virtual production adventures!